


TASSEL NECKLACE DIY
We make at least 1 trip to Home Depot every week and I’m always on the lookout for items I can use in unique ways for different projects. Lately, the plumbing section and all things copper have been triggering ideas. I’ve also been on a crazed tassel kick (further evidence here) and decided to take it out on a necklace design I’ve had in my head for a while. Ever since I posted them on Instagram, I’ve been getting so many comments and I figured maybe a few of you might want to make one.
The great thing about these is that they’re super easy to make, the supplies are really reasonable and they add a playful statement to any look. As my style continues to simplify I find myself turning to accessories to add uniqueness and interest to an outfit. I love these because they’re a little sculptural, a little bohemian and totally intriguing. So feel like making one or two? They’re a great weekend project and an even better gift for a friend!
HERE’S HOW
Supplies: Hemp Cording (cut to 19″) | Crochet Thread | Copper Coupling Tube | Crimp Beads | Lobster Clasp | Circle Rings | Small Elastics | Glasses Case (For tassel making) | Scissors | Needle Nose Pliers | Scotch Tape | Please Note: Supplies for both necklaces pictured but not necessary

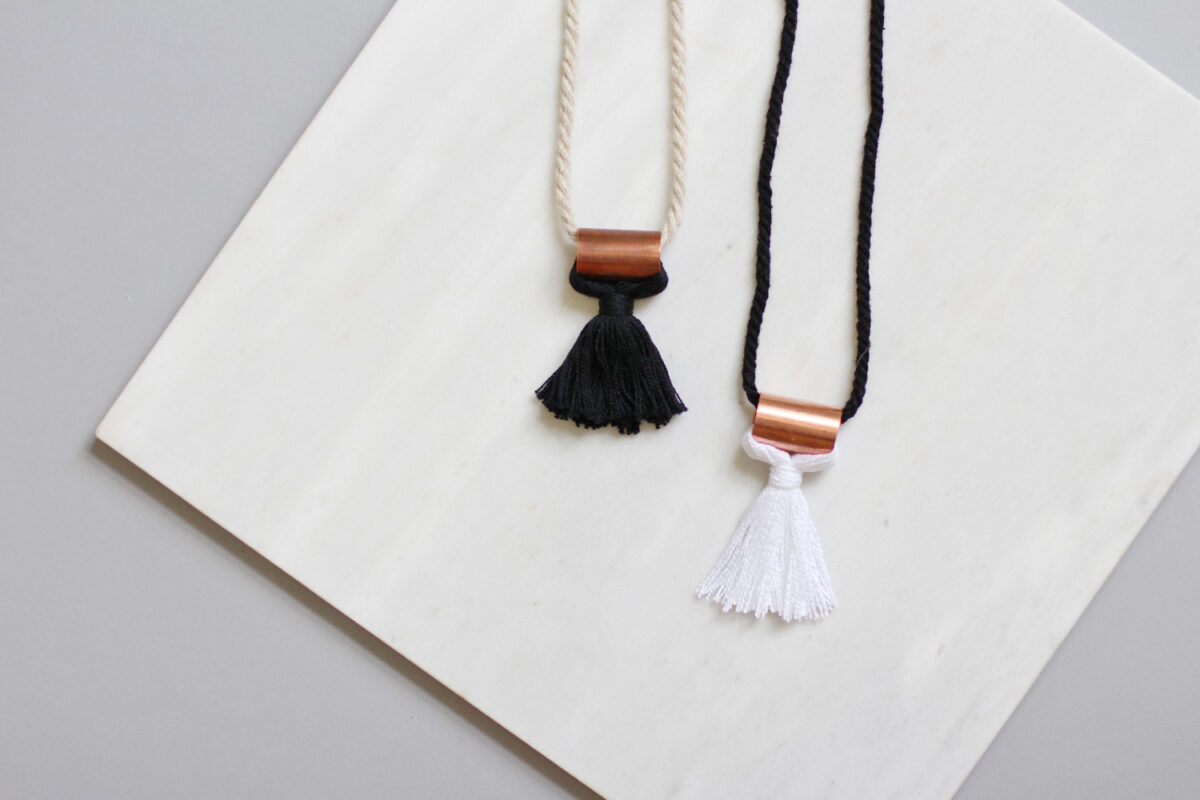
COPPER TASSEL BEAD
1. Wrap the crochet thread around your glasses case (or whatever you’re using) approximately 60 times then cut along one side.
2. You will have a thick cluster of thread. Feed it through the copper tube.
3. With the tube in the centre of the thread, bring the two ends together and tie a clear elastic as close to the copper tube as possible, to secure the tube and thread in place.
4. Wrap a new strand of thread around the elastic until it is fully covered. Knot and trim exces.

5. Trim the tassel ends so the they’re even. Sharp scissors or a rotary cutter make this easiest.
6. Attaching the clasps:
- Take your 19″ hemp cording (rope) and wrap a 1/4 inch strip of tape around the end to prevent fraying.
- Use your pliers to clamp the crimp beads over the taped ends.
- Add a small ring to each clamp bead.
- Add a larger ring to one end and a lobster clasp to the other end.

7. Thread the copper tassel bead onto the cording and your all set!

Finally, you’ll need to prepare yourself for some compliments and inquiries about where such a necklace can be acquired 🙂 The copper tube will start to oxidize over time and lose it’s shine but I personally love the patina it gets. If you look at the photo above you can see the difference between a new tube (white tassel) and a month old tube (black tassel).

Here’s a couple of ways I’m wearing them these days!


Hope you decide to give this little project a try!


Couldn’t help but notice the top you are wearing. Any details?
The striped top is a dress by Ace & Jig (available here) and the black top is a dress from ASOS available here). Xo
I’m going with a team to a children’s home in Zambia for the second time this weekend, and I think this would be a fun and easy craft for the girls! Plus, the supplies will easily fit in my suitcase. Thanks for the step-by-step instructions!
That’s so great Sarah! It would make a great project for the girls and they can wear them right away too. Have a safe and wonderful trip! Xo
These are so great! I think I might just have to try it 🙂 Thanks for the tutorial!
Thanks so much Gillian! Hope you do 🙂 xoxo